Managing Collections & Tags
Access the Collection Manager
Find the Collection Manager in the ⚙ Managers menu at the top of the page. Users require a ‘Content Manager’ role or higher to access.

Organising Your Collections
Using the file tree on the left hand side, you can organise your collections into ‘Domains’ and Sub Folders. Domains are top level areas that can hold Collections and Sub Folders. We recommend spending time to setup a structure of Domains and Folders that matches the way your company operates – It could be that you use the Domains to organise regions or business units for example.

You can also organise and filter the collections by Tags. Tags help organise and categorise your collections for easier discovery and management. When using the tools you can also select collections to use based on Tags. You can learn more about tags here.
Create or Edit a Domain
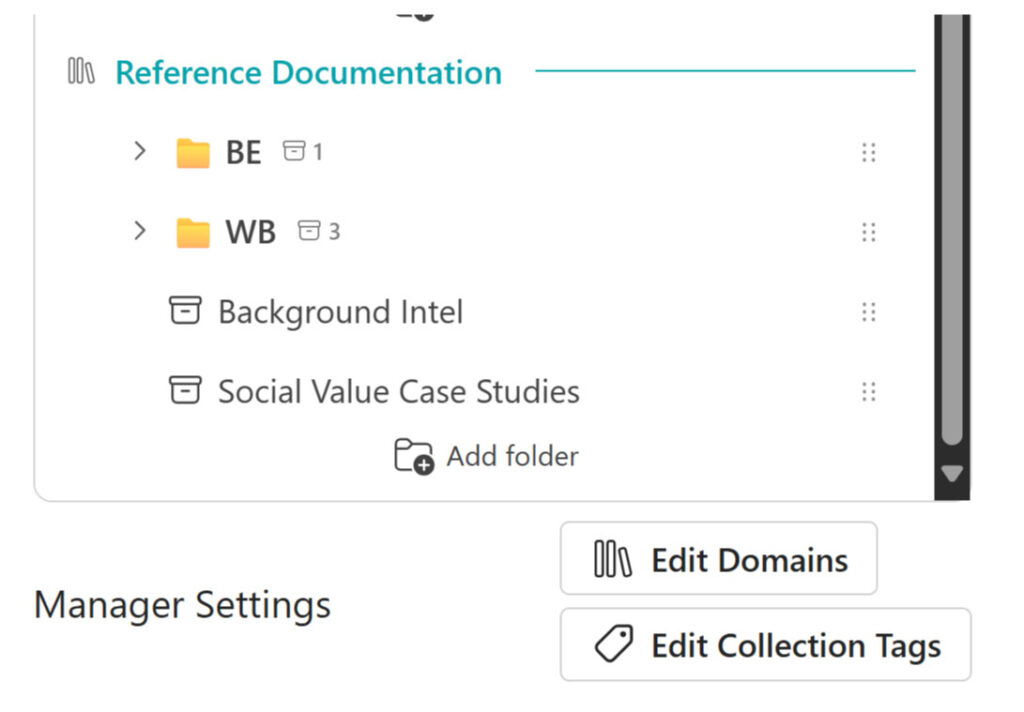
At the bottom of the list of collections are the “Manager Settings”.
- Open the “Edit Domains” menu.
- Enter the name of the new Domain you would like to add or use the Pencil to edit the names or Bin to delete Domains.
Create or Edit a Sub Folder
To create a new folder, you can right click on the Domain or Sub Folder where you would like to add the folder, or Click the “Add Folder” button at the bottom of the Domain.
To rename a folder, right click on the folder and choose “Rename folder”.
To Delete a folder, right click on the folder and choose “Delete folder”
Create a New Collection
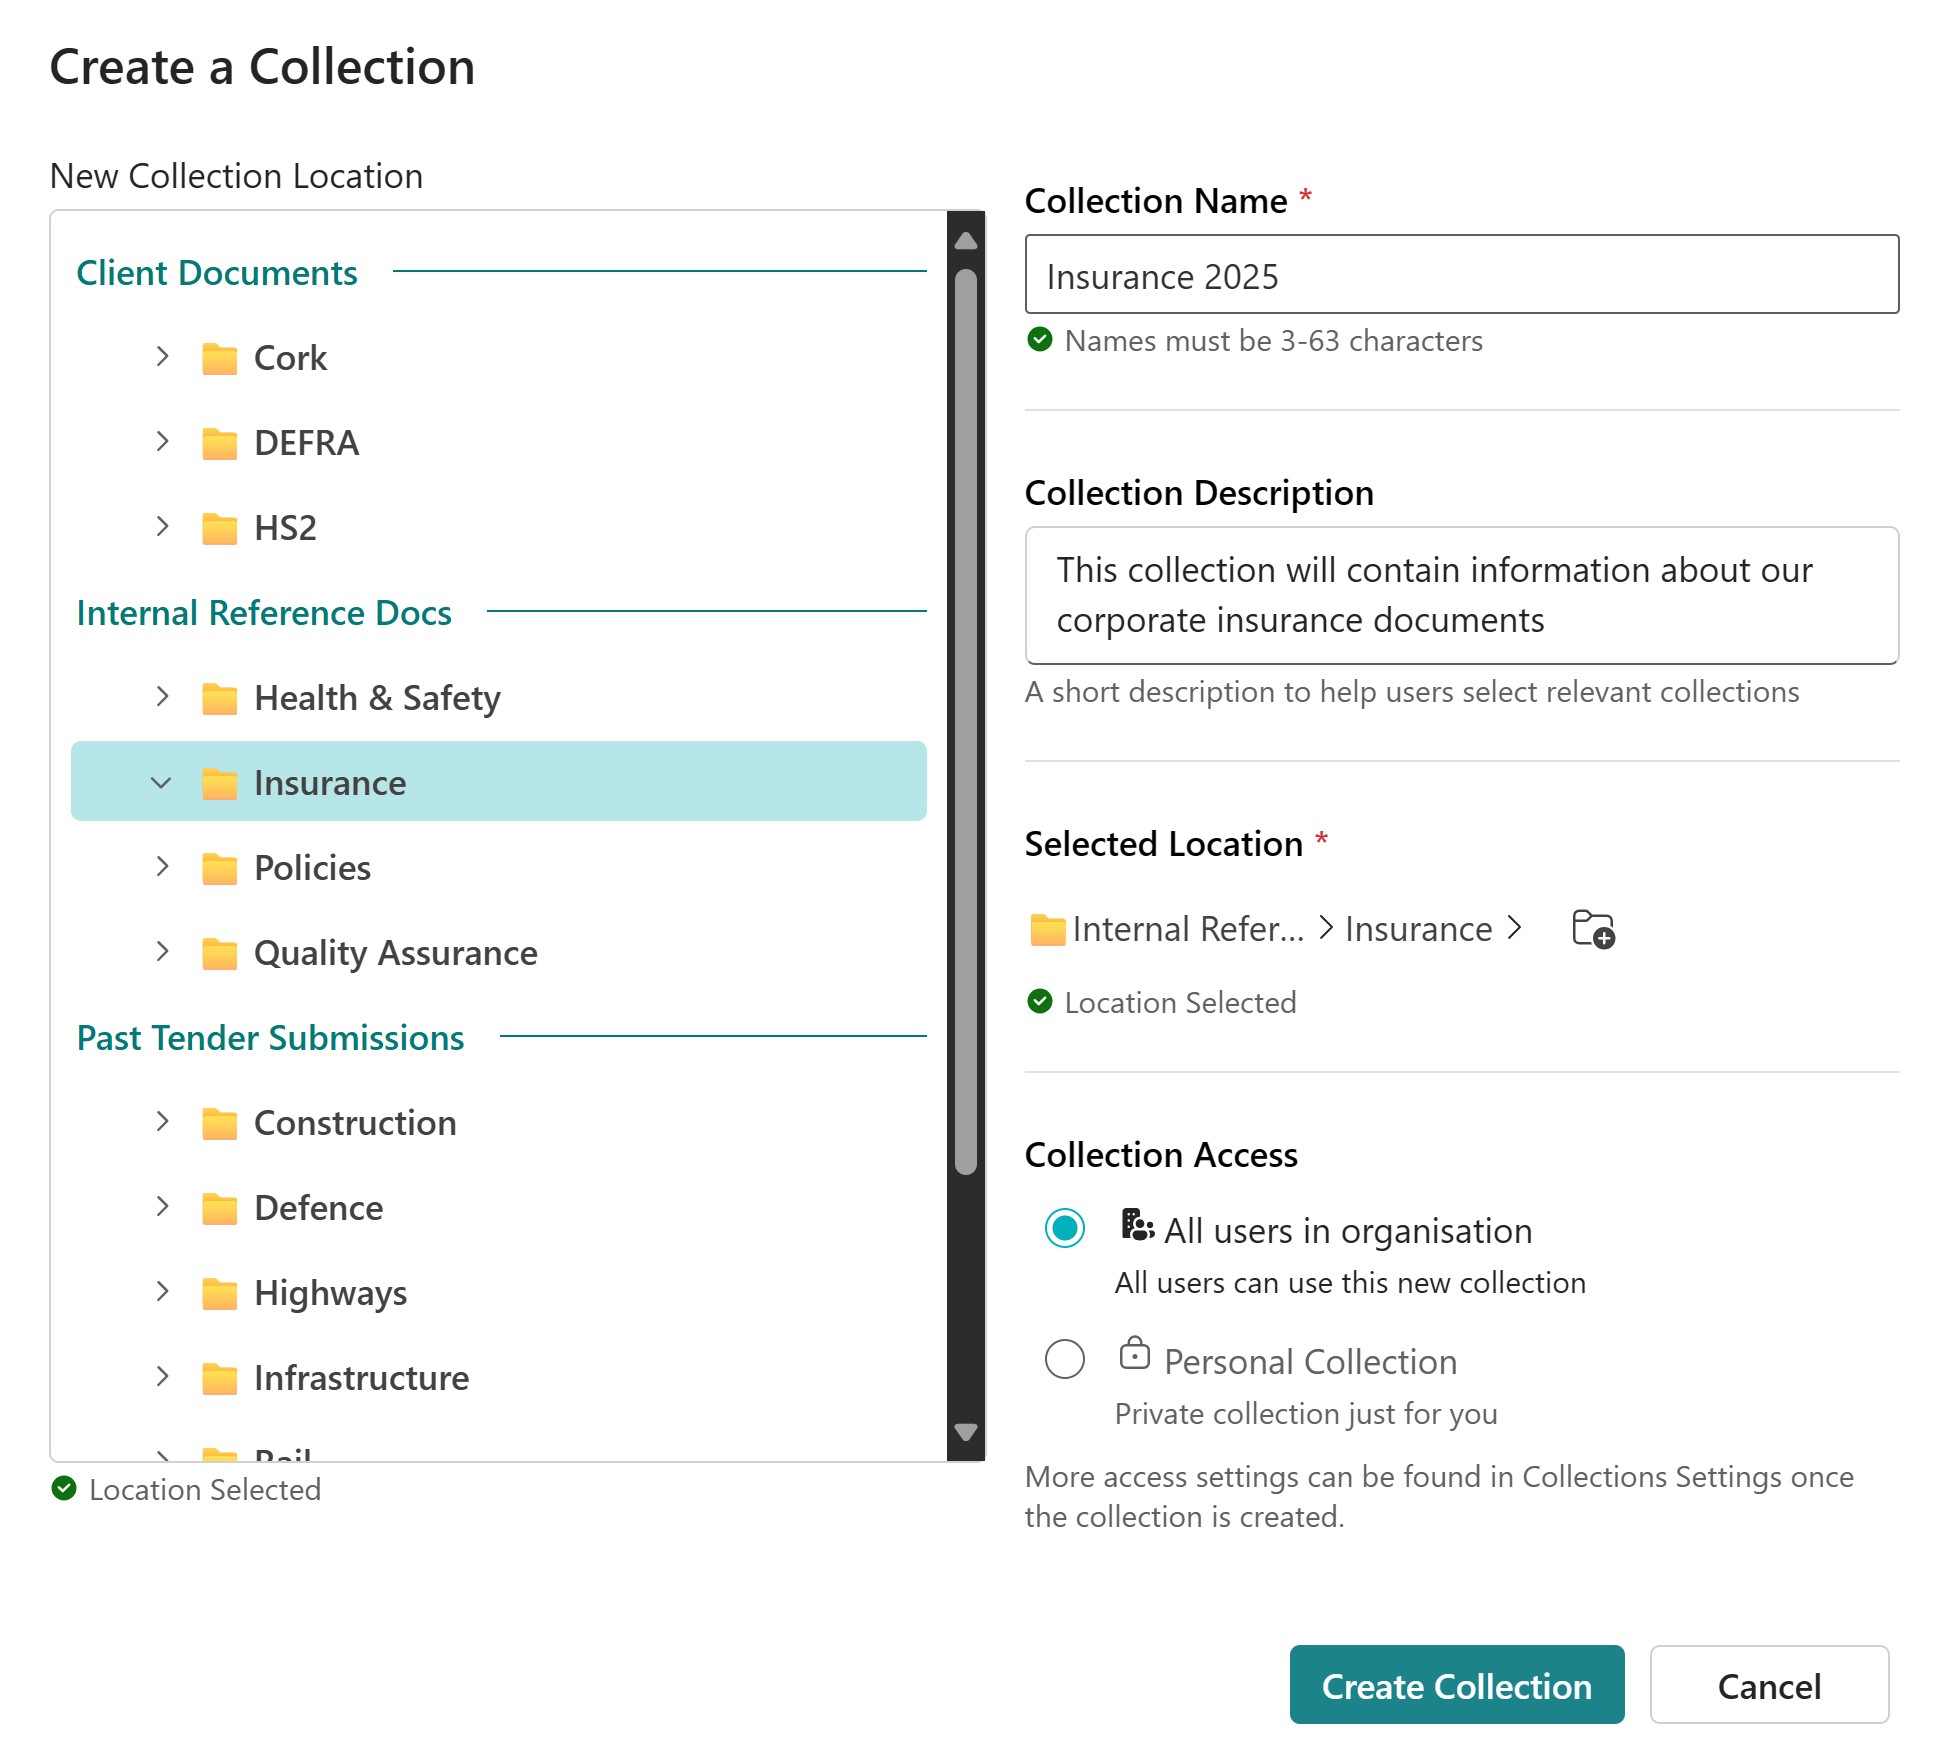
- Click “New Collection” on the left hand side or Right Click on the folder or ‘Domain’ you would like to create a new collection in.
- Enter the collection details:
- Name
- Description
- Select a location on the left, this can be a top level ‘Domain’ or a sub folder – If required, you can create a folder using the ‘new folder’ button. This will create a new folder in the currently selected location.

- You can choose to share the collection to the organisation or keep it as a private.
- Click “Create Collection”
Upload Documents
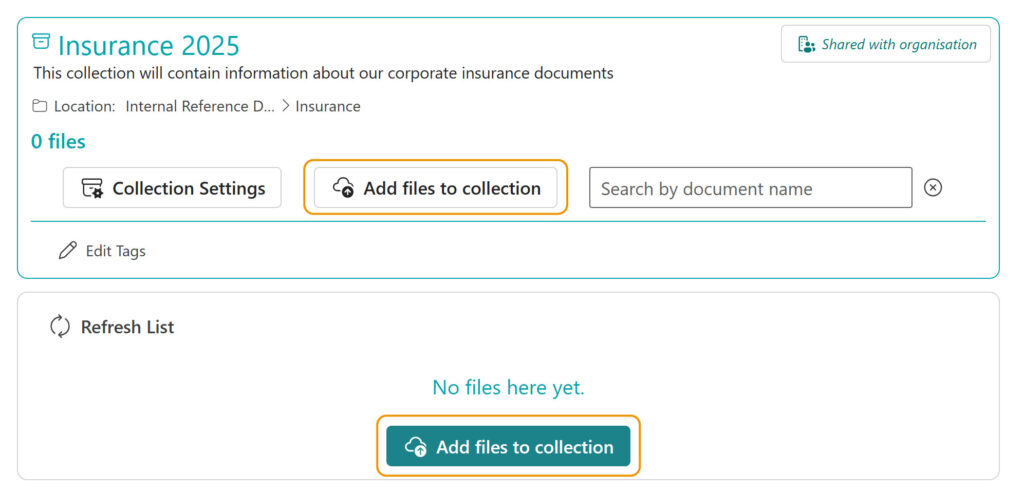
- Select the collection you would like to add files to.
- Click the ‘Add files to collection’ button. This will open the upload dialog, from here you can upload files by drag and dropping or clicking to select files.
- Supported file types:
- PDF documents
- Microsoft Office files (.docx, .xlsx)
- Image files (.jpg, .png, .tiff)
- Single web pages (via “Add Website Page”)
Important: Please remove any CAD drawings or large vector files before uploading.
Note: Documents need processing before they can be used with AI tools. This typically takes a couple of minutes but may take up to 24 hours for very large files.
Edit Collection Settings

Click “Collection Settings” in the toolbar above the collection files.
In the “General Settings” tab, you can modify the collection’s:
- Name
- Description
- Location
- Delete the collection
In the “Access Controls” tab, you can set who can use a collection, and who can edit a collection.
In the “Collection Tags” tab, you can assign tags to the collection.
Delete a Collection
- Click the “Collection Settings” option in the toolbar.
- Click “Delete” at the bottom.
- Type “Delete” to confirm
- Click “Delete Collection”
Warning: This permanently removes all documents in the collection and cannot be undone.
Access Controls
The access control allows collection owners to precisely manage who can view and edit their collections.
How to Control Collection Access
- Open Collection Settings: Navigate to your collection and select the settings option to access the “Access Controls” tab.
- Set Viewing Permissions: Choose from the options that determine who can see and use your collection.
- Configure Editing Rights: Control who can add, remove, or modify documents within your collection.
Viewing Permission Options
All People in Organisation
- Makes your collection visible to everyone in your organisation
- Provides the widest access for collaborative work
- Ideal for company-wide resources and shared knowledge
People You Choose
- Restricts access to specific users and groups you select
- Allows precise control over who can view the collection
- Perfect for confidential or department-specific content
Private
- Only you can see and access the collection
- Provides maximum security for sensitive materials
- Available only to collection owners
Managing User Lists
When selecting “People You Choose”, you can:
- Search and Add Users: Type names or email addresses to find and add specific team members
- Select Groups: Add entire groups instead of individual users for easier management
- View Group Sizes: See how many members each group contains before adding
- Remove Access: Easily remove users or groups from the access list
Editing Permission Controls
Standard Access
- File Managers who can view the collection automatically receive editing rights
- Provides streamlined access for most collaborative scenarios
Limited Access Mode
- Enables precise control over editing permissions
- Offers two restriction levels:
- Owner Only: Only you can make changes to the collection
- Selected Admins: Choose specific users who can edit (requires File Admin role)
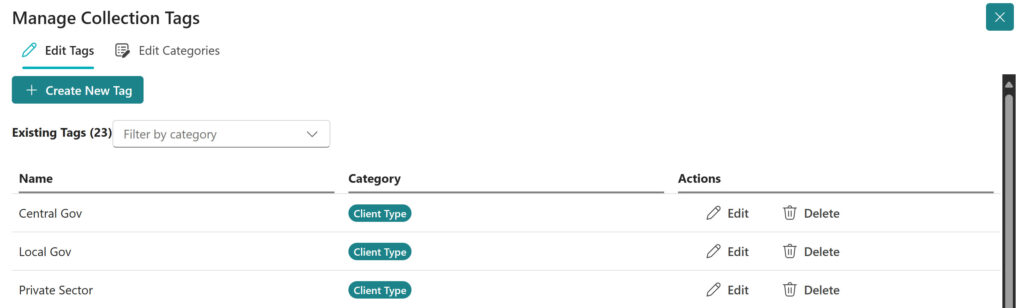
Collection Tags
You can create new tags by using the “Edit Collection Tags” menu at the bottom of the collection list in the Collection Manager.
Creating Tags
- Make sure you are on the “Edit Tags” tab in the Tag Manager.
- Click “Create New Tag” option at the top
- Enter a Tag Name and select a Category if you would like.
- Click “Create New Tag” to confirm the tag.
Creating Tag Categories
- Make sure you are on the “Edit Categories” tab in the Tag Manager.
- Click “Create New Tag Category” option at the top
- Enter a Category Name
- Click “Create Tag Category” to confirm.